We’re used to having information at our fingertips. What we don’t know can be looked up or downloaded using any number of websites or apps. But data from your car, especially a BMW, has been a little tougher to come by until now. P3Cars has developed this advanced digital gauge to fit in the dash of BMW E82 1-series, E9X 3-series, F10 5-series, and F30 3-series. First released as a simple boost gauge for turbo cars, the software has been tested and developed for naturally aspirated models too, including the M3. This is not just another boost gauge.
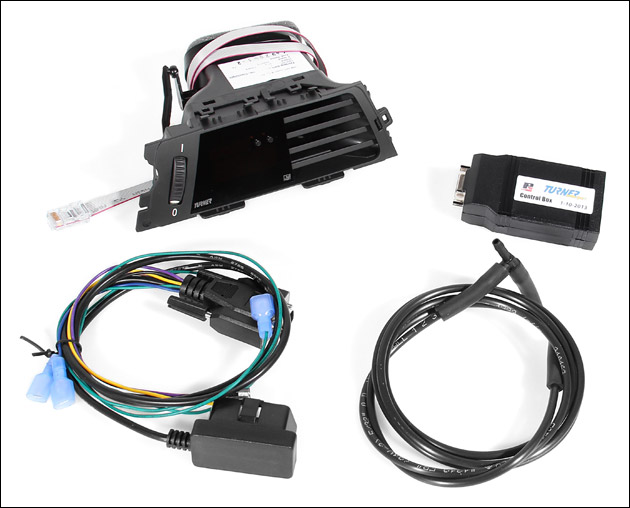
The P3Cars vent integrated digital interface (vidi) gauge plugs into the car’s standardized OBD plug in the left footwell. Run the cable up to the driver’s left air vent (above the headlight switch). P3’s digital gauge is integrated to the stock vent for a clean and almost factory-looking appearance. Minor trim removal is required for access during the install but this is really a plug-in installation that takes no more than 30 minutes if you’re taking your time.

P3 has developed software that draws data from the OBD plug. This plug is along the same CAN BUS information superhighway that the engine computer and body modules use for communication. It’s the same plug that dealerships and shops use to scan and read fault codes or update electronics. In fact, the P3 vidi gauge also functions as a fault code reader and clearing tool (for generic OBD “P codes”). The P3’s plug can be uninstalled for access to the OBD port by your mechanic or state inspection station.
With access through the OBD port, the full range of features on the vidi gauge is almost limitless. But for simplicity and ease-of-use only the most important and useful data is displayed: intake air temp, exhaust gas temp, coolant temp, boost/vacuum, ignition timing, throttle position, uncorrected speed, RPM, a shift light, battery voltage, acceleration timing, and brake timing. It will also save and display peak values for each parameter, allowing you to go back and analyze what’s been happening. See below for a more in-depth description of each parameter.

In keeping with the Motorsport and Performance heritage of Turner Motorsport the Turner Exclusive edition comes complete with additional performance timers. These additional acceleration timing features are performance measurements we figured our core customers would love most. 0-60 is joined by timing for 0-100 and braking from 60-0 and 100-0. These features are perfect to measure performance gains in a consistent way, storing your best time of the session. Adding an intake and software package? Well record the difference it makes in 0-60 and 0-100 times!
Not only is this data informative and, at times, entertaining but it also allows you to evaluate and analyze your car’s performance. The acceleration timer is obviously useful in evaluating horsepower upgrades but also in critiquing launch settings and technique. Ditto for the braking timer in analyzing the differences in brake pads or pedal application. Or use the peak recall function to see how much the traction control system is closing the throttle to reduce power output (might be time to upgrade to that limited slip…).
In addition to the data captured from the OBD plug, the P3Cars kit comes with three universal analog inputs. This can allow you to tap into charge pipes for actual boost pressure or reading boost on aftermarket supercharger kits (works great on boosted M3s!). On turbo engines you can monitor methanol injection by tapping into your meth kit. Other P3Cars features are a color matched display and automatic dimming with your other gauges. It can be configured to display either English and Metric units. P3 gauges are engineered specific for each chassis so a basic setup is required upon first install to match the gauge electronics with your car and to ensure it is communicating correctly.
This gauge upgrade will be one of the best mods you make to your car! It looks like a factory part, retains the function of the left side vent, and displays a wealth of useful information. You will be enjoying and utilizing this upgrade for as long as you own your car!
Installation
Installation is very very simple but does require a delicate touch because you are dealing with plastic trim pieces. Unscrew the lower knee bolster from under the steering column. Loosen and set aside or completely remove the lower kick panel with the hood release. This gives you greater access for running the cables and storing the components. Then pop the vent from the dash and remove the “OBD” cover from the kick panel. Run your cable and the low profile OBD plug through the dash and plug it into the OBD port. For N54 cars you must run a vacuum line to the charge-pipe for the gauge to read boost. We like to run the lines through the steering column boot but you can also route it through the e-box if desired. And if you are using any other auxiliary sensors now is the time to install those, run the wiring, and plug them into the P3 gauge harness. Plug all of your components together and reinstall the vent with the digital gauge. On E9X cars, the original OBD port cover can be reinstalled over the plug after some minor trimming for a truly seamless install. As you can see, the underside of the dash is pretty full of wiring already. Rather than wedge the P3 components into the wiring loom – where they might pinch or cut something critical – we will usually tape or press the pieces into the foam backing of the knee bolster. You can also zip tie them to something structural inside the dash but make sure you can still access them in the future.
When you first turn the car on, the gauge will go through a brief setup so that it can accurately interpret the data and set your user preferences. Follow the instructions on this page to complete the setup.
The P3 gauge includes a fault code (DTC) read and clear functions. If there are any stored fault codes, they will appear every time you turn the car on. These are the standardized 4-digit “P codes” and you can find their meanings through a simple web search, a Bentley Service Manual, phone/tablet apps, forums, BMW dealers, local service garages, state inspection stations, and other places.
Configuration & Setup
Operation guidelines
Installation Guidelines
E82 128i/135i P3 Gauge Installation [PDF]
E9X 328i/335i/M3 P3 Gauge Installation [PDF]
F10 528i/535i/550i/M5 P3 Gauge Installation [YouTube]
F30 328i/335i P3 Gauge Installation [YouTube]